We have an additional FAQ for the Horizontal Machine to supplement these instructions.
Please note that for PRF Plugs and Membranes, remember to check what kinds of tubes you are using, glass or silica-coated. As glass tubes are increasingly difficult to obtain, some clinicians have switched primarily to silica-coated plastic tubes. The protocol is slightly different for silica-coated plastic tubes, per the instructions below. If you use plain glass tubes, and have no issues using them, please use the glass tubes RPM.
When operating the centrifuge and related accessories, strict surgical and contamination control protocols, including, but not limited to, sterilization of all instruments prior to any use, must be followed to ensure patient safety and eliminate any risk of contamination. We are not affiliated in any manner whatsoever with Choukroun or his company Process for PRF. It is up to each clinician to keep up-to-date with the research for new PRF protocols. As the centrifuge is manual, you can always adjust the RPM/Time to fit the RCF value of any PRF protocol.
Overview
When operating the centrifuge and related accessories, strict surgical and contamination control protocols, including, but not limited to, sterilization of all instruments prior to any use, must be followed to ensure patient safety and eliminate any risk of contamination.
Blood Drawing for PRF
“The success of this technique entirely depends on the speed of blood collection and transfer to the centrifuge. Indeed, without anticoagulant, the blood samples start to coagulate almost immediately upon contact with the tube glass, and it takes a minimum of a few minutes of centrifugation to concentrate fibrinogen in the middle and upper part of the tube. Quick handling is the only way to obtain a clinically usable PRF clot. If the duration required to collect blood and launch centrifugation is overly long, failure will occur: The fibrin will polymerize in a diffuse way in the tube and only a small blood clot without consistency will be obtained.”
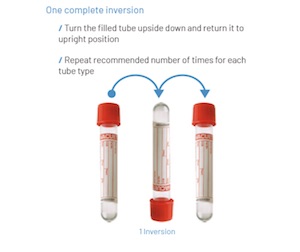
![]() IMPORTANT: When using silica-coated tubes, please remember to gently invert (turn upside down and right side up - do NOT shake) the tube 3 to 5 times after drawing blood and before placing the tubes in the centrifuge. This helps activate the clotting. This inversion is NOT necessary for plain glass tubes.
IMPORTANT: When using silica-coated tubes, please remember to gently invert (turn upside down and right side up - do NOT shake) the tube 3 to 5 times after drawing blood and before placing the tubes in the centrifuge. This helps activate the clotting. This inversion is NOT necessary for plain glass tubes.
See: Platelet-rich fibrin (PRF): A second-generation platelet concentrate. Part I: Technological concepts and evolution, link: Second Generation > Remember one single rule: The blood drawing has to be as fast as possible. It’s essential for the PRF clot quality. > It is never recommended to do the blood aspiration with a syringe! The tubes are under vaccum. The blood stops being collected when the tube is full. When the tube is full, place it in the centrifuge.
Tube Selection:
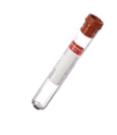
For A-PRF/L-PRF (PRF Plugs and Membranes, and A-PRF Liquid): You must use the Red Cap, Tubes
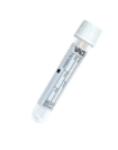
For i-PRF (injectable liquid PRF): You must use the White Cap, Greiner Plastic Tubes.
Wipe down Tubes: It is best practice to wipe down the entire surfaces of any tubes you intend to use for the PRF, with disinfectant wipes and/or alcohol prior to drawing the blood.
Centrifuge Preparation for PRF
Ensure proper support for Tubes before centrifugation:
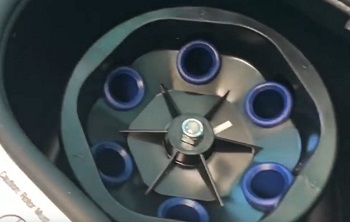
When placing tubes into the Centrifuge, you must ensure that the tubes are supported from the bottom and not hanging by their caps. Use the provided blue adaptors (pictured below) to properly secure the tubes. Place these adaptors in the centrifuge, prior to inserting tubes
IMPORTANT: Balance the Tubes!
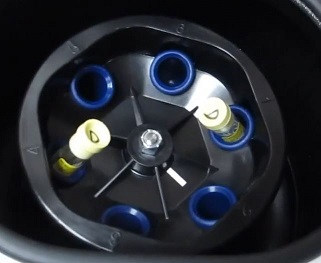
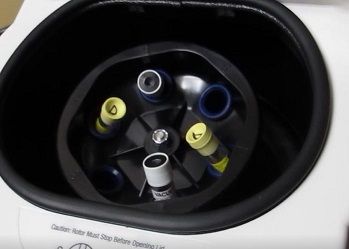
As shown in the videos below, the number of tubes collected must always be BALANCED 2 by 2. Repeat: You MUST balance the tubes in the centrifuge (opposite, 2 by 2). If you do not do this, you’ll get vibrations during the centrifugation and failure will occur. If you haven’t collected an even number of tubes, then prepare a tube with water to balance the other tubes. This tube with water will be used to obtain an even balance with the other tubes. Please watch the video above, which shows an example, were 2 tubes are drawn with blood and the other 2 tubes are filled with water as a balance.
Seen below is a picture of 2 dummy tubes filled with water to balance the centrifuge. Subsequently, 2 more real tubes for iPRF were placed opposite.
Before you start the Centrifuge, be sure to choose the setting you want for the particular PRF protocol desired. The machine comes preset with 2 settings: Solid PRF (PRF Plugs and Membranes) and Liquid PRF (iPRF injectable PRF). There are an additional 8 potential custom settings you can program on your own.
Pre-Setting 1: Solid PRF (PRF Plugs and Membranes):
-
For Glass Tubes ONLY: 2,300 RPM for 8 minutes (optionally, after complete stop, run the 3rd setting for another 4 minutes).
-
For Silica-Coated Plastic Tubes: 2,300 RPM for 8 Minutes. Some users report good results also with 2300 rpm for 12 mins. You can program this setting, as well, as a custom setting.
NOTE: Remember, with silica coated tubes, you should invert the tubes gently (turn upside down gently, do NOT shake) around 3 to 5 times after drawing blood and before you place them into the centrifuge. There is wide variability of plugs and membranes appearance based on patient-specific factors 2, and the above settings are just what works in the majority of cases, but not all. Sometimes you might need to spin longer or wait longer after the spin cycle.
Pre-Setting 2: Liquid PRF (iPRF - injectable PRF): 1,200 RPM for 8 minutes.
**Sample Custom Setting 3: 2,300 RPM for 4 minute (you can also created your own for 6 minutes.) (This is only a SAMPLE custom setting we have pre-programmed, as an example of using custom settings. You can use it, if after running the Solid PRF Setting 1 you wish to spin A-PRF for a longer period of time. See below.)
Need a new custom setting? If you want to learn how to generate a custom setting, please watch the video below in the section about custom settings.
PRF Spin Protocols
The protocols below are the standard protocols for the specifications of this particular centrifuge. There are other PRF protocols described in the literature, and at various courses, as researchers are constantly tweaking their methods. You should inquire with the appropriate instructor, what G-Force handling you need for a specific protocol. All protocols listed below are for information purposes ONLY. It is assumed that the user has been properly trained in the various protocols.
Remember: All Instruments must be sterilized prior to every use.
I. PRF Plugs and Membranes Solid PRF - Setting 1 = Use the RED tube
-
Glass Tubes: 2,300 rpm / 8mn. (~750 RCF - see below for conversion info). Optionally, after complete stop, run the 3rd setting for another 4 minutes.
-
Silica-coated tubes: Run this 1st setting twice! So run setting 1, 2,300 RPM for 8 minutes. Let the machine come to a complete stop and then run the cycle again one more time (2,300 RPM for 8 Minutes). If it is easier for you, you can program a 2,300 RPM for 16 minute cycle as a custom setting. You may also try another user reported setting of 2,400 RPM for 14 minutes, as a custom setting.
For making clots and membranes. Draw the blood fast and spin them. At the end of the spin, REMEMBER to remove the tube and remove the caps, place the tubes in the sterile tube holder WITHOUT the caps/lids and let them rest for about 5 minutes to achieve the full clotting. Remove the clots and put them in the Box and cover with the white crusher.
- Take the fibrin clot into the opened tube with the sterile PRF forceps.
- To separate the fibrin clot from the red cells easily: Put the clot on the mini-tray covered with a gauze and use the scissors to peel off the red clot.
- Put the PRF clots on the Box grid and cover them with the tray, then put the lid on (always).
- Make membranes: Put the clots after separation on the grid. Cover with the crusher and then put the lid. The membranes will be ready for use after 2 min. The membranes remain intact (without any dehydratation and with a constant thickness). The exudate collected in the bottom is very rich in proteins (Fibronectin and Vitronectin).
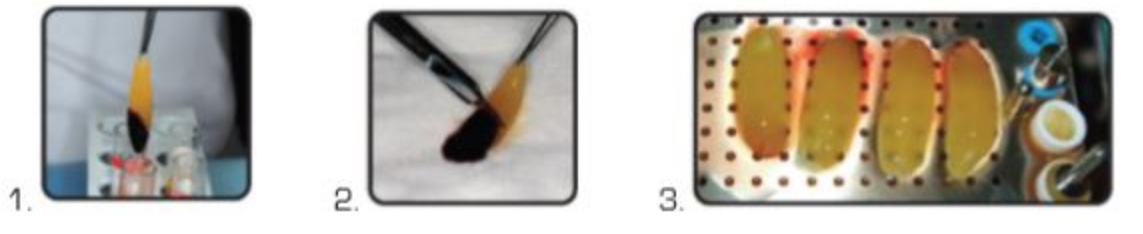
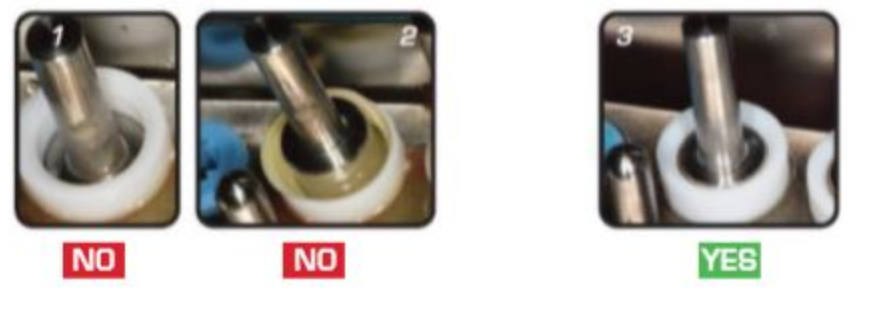
- Make plugs of PRF: Place a clot in each cylinder and push it with the metal piston. The piston musn’t be partially or fully depressed (photo 1 and 2). It must be stopped at the edge of the white Teflon cylinder (photo 3). The plugs can be used immediately for socket extractions filling.
- Keep the exudate recovered at the bottom of the box: To hydrate Biomaterials, To flush the surgical sites, sockets and cysts, and To preserve the autogenous bone blocks (rather than in saline)
The PRF can be used as membranes in the following situations:
As a whole membrane: on the implants after being punched, on bone graft, under the gingiva, on the palate: covering the harvest area of the connective tissue (membrane will then be sutured), etc…
Membrane(s) cut into small pieces: with the scissors supplied. These fragments will be mixed with biomaterials.
In the sinus-lift: apply one or two PRF membranes folded twice under the Schneiderian membrane with the PRF Pad. Mix 1 to 2 membranes cut into small pieces with the biomaterial. Use 1 or 2 membranes for a lateral closure of the sinus. If the sinus membrane is punctured, it can be repaired using 1 or 2 PRF membranes folded twice. PRF immediately sticks to the Schneiderian membrane.
In the extraction sites, it is preferable to use the cylinders prepared in the PRF BoX. To compress the PRF plugs in the socket, use a gauze hydrated and not a metal instrument.
II. i-PRF (Injectable PRF) Female = White plastic Tube from Greiner
1200 rpm / 8mn (~200 RCF - see below for conversion info)
Some users report better results with these settings for Liquid PRF:
1,500 RPM (~300 RCF) for 5 Minutes for Females
1,900 RPM (~500 RCF) for 5 Minutes for Males (It’s not clear if this is necessary for all males, but the original Choukroun protocol also had different male/female settings)
If you want to try these settings, please create 2 new custom settings on your machine with these settings and try it out.
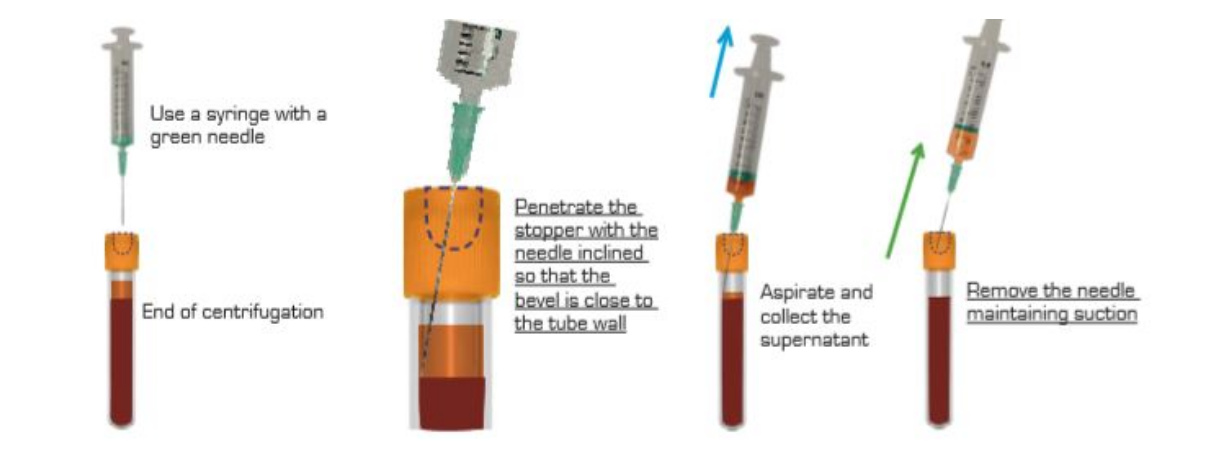
- At the end of the spin, a orange supernatant will form on the surface.
- Penetrate the cap with a 21G needle (green) mounted on a syringe.
- Place the bevel of the needle in the middle of the i-PRF supernatant, against the wall of the tube (better visibility).
- Aspirate until the level of the red blood cells raises up to the needle bevel.
- Remove the needle maintaining suction.
- i-PRF remains liquid for about 10 -12 minutes, then it will clot. The injection will have to be done before the end of these 10 -12 minutes.
How to use i-PRF
Remember: The blood for i-PRF must be drawn just before injection. It cannot be prepared in advance.
The i-PRF can be injected:
- Into the soft tissues
- In the bone graft. Mix the granules with the A-PRF (as usual), and pour the i-PRF drop by drop to avoid an overflow. Wait a few seconds and go on until you obtain the complete coagulation of the biomaterials (in less than a minute). If you inject too fast, the i-PRF will overflow from the bone graft!
- Into the sinus, after the filling . The granules will be fixed and coagulated.
- The i-PRF can be used to coagulate the biomaterials before application. This is the steak technique.
Horizontal Centrifuge Videos
Operating the Horizontal Centrifuge

Setting Custom Cycles on the Horizontal Centrifuge
With the Premium Horizontal PRF Horizon 6 Flex Centrifuge creating custom settings is easy. We have already programmed a sample custom setting in setting 3, that may prove useful, if you want to run another short Solid PRF cycle for some patients.
How to create a custom setting? If you want to learn how to generate a custom setting, please watch the video below.
If you want to use another protocol that you read about in the literature or heard at a lecture, you should inquire from the any presenter what particular centrifuge they are using for a particular protocol, and what RPM/time they have used, as well as the G-Force (defined as RCFmax) . With the Horizon 6 Flex Horizontal Centrifuge, you can create PRF as described in any protocol by properly setting the RPM/time which would correspond to the proper RCF.
RCF (RCF max) describes the amount of accelerative force applied to a sample in a centrifuge. As RCF is a function of the RPM and radius of the centrifuge, PRF protocol results derived from using centrifuges with different radii are not comparable, and the RPM may need to be adjusted to achieve a similar RCF on a different centrifuge. However, different PRF protocols can be replicated assuming you get the correct information about the protocol and the machine used.
There is a simple online calculator to figure out the equation for RCF (we assume RCFmax is used, which is the international standard of measurement). The radius on the Horizon 6 Flex is approximately 127mm.
Simply use the Gear Setting and watch the video below to program your new setting.

Additional Helpful PRF Videos
PRF Course Highlights
PRF Sticky Collagen Plugs

Horizontal Centrifuge References
- Evaluation of 24 protocols for the production of platelet-rich fibrin
Evaluation of 24 protocols for the production of platelet-rich fibrin | BMC Oral Health | Springer Nature Link
The best yield of leukocytes was achieved after centrifugation for 8 min utilizing the 700, 1000 and 1200g protocols. Of those the highest concentration was achieved at 700g for 8 min (owing to the reduced total plasma volume). Another noteworthy trend that was apparent was that as centrifugation time was increased, a general increase in percent yield was observed, however generally speaking, an overall decrease in concentration was observed
- Another factor that is very important to recognize when dealing with the PRF clot is the patient! There is wide variability in results between patients, and this is something highlighted in many PRF studies including that of Miron, cited below. In patients on some sort of anti-coagulant, there is ongoing research 3, but we have seen recommendations of 18 minute spin cycles for these patients.
Interestingly, there was also variability reported between patients. As erythrocytes and other blood components also play a role in coagulation, as well as the hematocrit counts vary between patients and affect the size of PRF membranes We have previously shown that both females and patients above the age of 65 typically have larger membranes as a result of their lower hematocrit counts. Future research is needed to better understand how centrifugation speed and time may be further optimized to result in similar final cell concentrations from patients with different starting blood cell counts. In summary, patients with lower cell blood counts would theoretically require lower centrifugation speeds, and further computational research is likely needed to optimize the protocols.1,2
- Miron RJ, Dham A, Dham U, Zhang Y, Pikos MA, Sculean A. The effect of age, gender, and time between blood draw and start of centrifugation on the size outcomes of platelet-rich fibrin (PRF) membranes. Clin Oral Invest. 2018;23:2179–85.
Also noted in the above article:
a clinician has approximately 60–90 s between blood draw and the start of the centrifugation cycle to produce standard-sized PRF membranes.
- Evaluation of 24 protocols for the production of platelet-rich fibrin (linked to above in an earlier comment)
- J Craniofac Surg 2020 Jan/Feb;31(1):e13-e18. doi: 10.1097/SCS.0000000000005808.
The Effect of Warfarin on the Fibrin Architecture of Platelet-Rich Fibrin